Clinicians use palpable landmarks and structures they can see to infer location of organs, vessels, and nerves they cannot see. First, we will paint onto the body the palpable landmarks typically used during the general physical exam of the neck and trunk. We will use these markings to locate and paint the location of organs, vessels and places to auscultate (listen) to the flow of blood. These paintings are known as the "surface projections". As you will see, "surface anatomy" is of prime concern to the diagnostician. Instead of painting each organ and vessel, we will restrict ourselves to the structures that are typically examined in a general physical examination. In essence, we will be learning the spatial relationship between internal structures and the skeleton.
At any time you can rotate the 3D image and add or subtract structures to enhance your understanding of the anatomy. Clicking a red hyperlink will bring you back to a starting point. Remember to use the identification rollover feature to see structure labels (click the "dissect" or "highlight" button to activate mouse rollover structure identification). Moving the transverse, coronal, or sagittal planes in the 3D window selects the cross-section in the corresponding window. Centering any structure (point) in one of the three cross-section windows will center that same structure (point) in the perpendicular cross-section windows. Color highlighting in the 3D image will also be shown in the cross-sections.)
Midline and related structures
Suprasternal notch and Sternal Angle of Louis
Insert your finger gently into the suprasternal notch on the midline at the superior end of the sternum.
Which bones lie lateral and inferior to your finger?
The clavicles and manubrium.
Let's look at these structures. (You can change the opacity of the skin at any time using the "skin" icon at the bottom left of the 3D image.)
What vertebral level is in the same transverse plane as the notch? Why is it lower than T1? To answer, look at the lateral skeleton by rotating the 3D image to a lateral view and examine the mid-sagittal cross-section. (Use mouse rollover to identify vertebrae and the manubrium).
Roughly T2 or T3. Even though rib 1 articulates near the manubrioclavicular joint, the ribs slope inferiorly from posterior to anterior.
From the notch, slide your finger down the manubrium (~5cm) until you encounter a transverse ridge. This is the vertex of the Sternal Angle of Louis. To demonstrate this, add and highlight another part of the sternum, the body of the sternum. The manubrium and body of the sternum form the Sternal Angle of Louis.
Continue to use the tools of VH Dissector to answer the following questions:
Which rib articulates at the Sternal Angle of Louis?
Costal cartilage of rib 2.
What vertebral level is in the same transvers plane as the Sternal Angle of Louis? Why?
T5. Again, because the ribs slope inferiorly from posterior to anterior
We belabor this point because of its value when interpreting radiographs and performing physical examinations. To help relate the superior end of the manubrium (suprasternal notch) and the inferior end of the manubrium (the vertex of the Sternal Angle of Louis) to the vertebral column, add the cervical and thoracic vertebrae. Thoracic vertebrae differ from cervical vertebrae as they articulate with ribs. Add rib 1 to identify thoracic vertebra 1 (T1). Remove the highlighting of T3. Which vertebra is in the same axial plane as the Sternal Angle of Louis? Now remove the highlighting of T5.
Xiphoid process and costal margins
Slide your finger to the bottom of the body of the sternum and palpate the xiphisternal joint and xiphoid process. The xiphoid process often points inward and may be difficult to palpate. Rotate the 3D image to a right anterolateral view and add the xiphoid process.
What vertebral level is in the same transverse plane as the xiphisternal joint?
T10.
Add the costal cartilages on one side to indicate which ribs articulate (via their costal cartilage) directly to the sternum and which costal cartilages form the costal margin. Now add ribs 7 and 12 for reference and highlight T10. Take a moment to vary the skin opacity of the 3D image to better appreciate this surface anatomy.
Pubic symphysis and the Inguinal Ligaments of Poupart
Look for a gap along the anterior midline between the left and right hip (pelvic) bones. This space is occupied by cartilage as part of the anterior pelvic articulation known as the pubic symphysis. Rotate the body back and forth a few degrees to be sure you are looking at the narrow, anterior gap. The Inguinal Ligament of Poupart connects the pubic tubercle (just lateral to the pubic symphysis) to the anterior iliac spine. The ligament is hard to see in the cross-sectional images. It is yellow and centered in the crosshairs. Use the zoom tool to make it larger. Click the move tool and use ctrl-arrow or command-arrow to move a cross-sectional image by steps and trace the ligament back and forth to its attachments. Rotate the 3D image to a left anterolateral view to appreciate the position of the ligament. Locate these attachments and palpate them on yourself.
Which body compartment lies superior to, and which compartment lies inferior to, the ligament?
We'll cut you some slack here: The abdominal cavity lies superiorly and the anterior compartment of the thigh lies inferiorly.
To complete the vertebral column, add the sacrum and lumbar vertebrae.
Under the 3D image, click on the "planes" icon. Turn each plane on one at a time. Grab it with your mouse and move it. Observe what happens in the cross-section windows as you move the plane and release the mouse. (Note that the man in VH Dissector is not standing in the anatomical position. If he were, his arms would be at his side with his palms facing anterior. This would put his thumbs in a lateral position and his pinkies medial (closer to the midline of the body). He would also be standing flat footed.)
For the individual standing upright, these planes cut through the body parallel to the floor. Use bony landmarks to locate them and draw them with black marker as dashed lines.
Transpyloric plane
This transverse plane lies half-way between the suprasternal notch and the pubic symphysis. On a fit and trim individual this plane also lies half-way between the xiphoid process and the umbilicus (belly button).
Which vertebra is in the transpyloric plane?
On average, the pylorus (the exit of the stomach) and L1 (or the L1/L2 disc) lie in this plane. In this individual the plane lies a little higher, close to T12.
Now highlight L1.
Plane through the iliac crests
Draw a line between the iliac crests (the superior edge of the hip bones).
Which vertebra is in the transverse plane that includes these two points?
Typically the disc between L4 and L5.
Highlight this structure. On the back, this is where spinal tap and epidural anesthesia procedures are performed. Increase the skin opacity to show the relationship of the umbilicus to this plane. Typically, in the thin individual, the umbilicus lies superior to this trans-iliac crest plane, in a plane called the subcostal plane. The umbilicus is not as reliable bony landmarks!
Subcostal plane
The subcostal plane lies at the inferior edge of the costal cartilages. The umbilicus more typically lies in this plane on the slender individual. Let's mark this plane by highlighting L3. Together with the midsagittal plane, the transumbilical plane is used by clinicians to divide the abdomen into quadrants.
The midsagittal plane divides the body into left and right halves. Clinically, the midsagittal plane is the most important sagittal plane.
Right and left refers to the patient's (or your donor's) right or left. This is easy to forget when you are looking at an imaging study or pointing something out on your donor.
Parasagittal planes parallel the midsagittal plane. An important parasagittal plane includes the mid-clavicular line - a vertical line through the midpoint of each clavicle. The mid-clavicular line should cross the nipples. The nipples overlie which rib or intercostal space?
Hint: use your previous observation that the second costal cartilage articulates with the Sternal Angle of Louis. Count ribs, down from the second rib. Alternatively, vary the skin opacity of the 3D image. The costal location of the nipples will vary for women with pendulous breasts. Note how the mid-clavicular line crosses the costal margin close to where the transpyloric plane (L1 or L1/L2 disc) crosses the costal margin.
The midaxillary plane (through the middle of the armpits) divides the body into anterior and posterior portions. Clinicians commonly refer also to the anterior and posterior axillary lines, which cross the anterior or posterior borders of the armpits.
Diaphragm
The phrenic diaphragm separates the cavity of the thorax from the cavity of the abdomen. Examine the diaphragm in each of the cross-sectional planes. Grab the sagittal cross-section and watch the coronal cross-section follow as you move the sagittal image up and down. Also observe the transverse cross-section when you release the mouse. Now move the coronal cross-section from side to side as you observe the axial cross-section follow. Also observe the sagittal cross-section when you release the mouse. Do this until you get the sense that the diaphragm is a domed structure with two peaks.
Why is the dome higher on the right side?
What lies inferior to the diaphragm on the right side? Use a mouse rollover on the coronal-section to find out. Make sure you are on the cadaver's right (Hint: increase skin opacity in the 3D window)!
Use a solid line to draw the diaphragm as it appears in a mid-axillary coronal plane during shallow inspiration.
Why does the diaphragm move with each breath in proportion to the depth of the breath?
By contracting, the diaphragm enlarges the thorax. The negative pressure (vacuum) that is created draws air into the lungs, which expand to occupy the space that is created.
Which air sinuses open into the nose?
(1) Frontal, (2) Ethmoid, (3) Maxillary and (4) Sphenoid
Each sinus is visible, because the corresponding bone was removed from the image. Use the "rotate" icon to see the entire skull. To make the image appear more 3D, use the left and right arrows to rotate the image back and forth. Note that the lining of the sinus is brick (orange-red), but air within the sinus is taupe.
Sinus (1): In the 3D window, see the brick lining of the sinus peaking through deficiencies in the roof of the orbit. Dissect the frontal bone to see more.
Sinus (2): In the 3D window, see the brick lining of the sinus peaking through deficiencies in the medial wall of the orbit. Dissect the ethmoid and frontal bones to see more.
Sinus (3): In the 3D window, see the brick lining of the sinus peaking through deficiencies in the floor of the orbit. Dissect the zygomatic and maxillary bones to see more.
Sinus (4): In the 3D window, see the brick lining of the sinus peaking through deficiencies in the sphenoid bone deep in the nasopharynx (ethmoid bone already removed). Dissect the sphenoid bone to see more.
Which of these can be palpated or transilluminated during physical examination?
Frontal and Maxillary – both procedures; Ethmoid – palpation only
Palpate the hyoid bone at the junction between the neck and the floor of the mouth. Slide it from side to side. Palpate your hyoid bone and swallow.
What function is served by the hyoid being pulled superiorly during swallowing?
We'll cut you some slack here: This action pulls the larynx superiorly as part of the swallowing mechanism that directs food down the esophagus instead of the trachea.
Anterior cervical triangles on each side of the neck are bounded by the anterior midline, the body of the mandible, and the anterior border of the sternocleidomastoid muscle. Find your right sternocleidomastoid muscle by looking in a mirror and resting your chin in your left palm with your fingers draped over the left side of your face. Resist head motion with your left hand as you try to turn your head up and to the left. Palpate the anterior and posterior borders of the sternocleidomastoid muscle with your right hand.
Posterior cervical triangles on each side of the neck are bounded by the posterior borders of the sternocleidomastoid muscles, the clavicles, and the trapezius muscles.
Find the inferoposterior boundry of the neck by resting your chin on your chest and sliding your hand down the back of your neck to a bony prominence, the spinous process of C7.
Relate lymph nodes of the neck to these landmarks, demonstrated here on the right side: superficial and deep lymph nodes.
Note that superficial cervical nodes drain into deep, central nodes that lie along the carotid sheath, which houses the internal jugular vein and carotid artery.
There are different naming systems for these nodes. One is to use descriptive anatomical terms (preauricular, postauricular, occipital, posterior cervical, submandibular, submental, anterior cervical, superficial cervical and supraclavicular). Note how these common clinical descriptors differ from the anatomical descriptors used by the VH Dissector.
Another clinical naming system refers to "levels" of the neck, as described by otolaryngologists. (To return to this place in the lesson, right click in the window for a "back" button.)
Just below the hyoid bone palpate the thyroid cartilage (Adam's apple), and below that the first cartilaginous ring of the trachea, the cricoid cartilage. To better appreciate the relationship of the hyoid bone, thyroid and cricoid cartilage, rotate the 3D image 360°. Now add the rest of the trachea (just the tracheal rings (cartilage) are show, which you can palpate).
What happens to the trachea when you swallow? Why?
The trachea elevates because it is attached to the larynx, which is elevated during swallowing.
The common carotid artery bifurcates in the neck as it travels superiorly. This is an area of turbulence where an atherosclerotic plaque can develop and create audible turbulence. On yourself, palpate the lateral horn of the hyoid bone and the superolateral aspect of the thyroid cartilage. From here push the sternocleidomastoid muscle laterally (we'll add this muscle only on the right side), and feel for a pulse. Gradually rotate the 3D image to a left anterolateral view.
The thyroid gland lies on either side of the trachea. The two sides (lobes) are joined by an isthmus that crosses superficial to the trachea just below the cricoid cartilage. The isthmus is not normally palpable, because it is small. The main portions of the gland are not normally palpable, because they lie behind several muscle layers. Rotate the 3D image to appreciate the relationships of the thyroid to its surroundings.
For clarity, remove the body of the sternum and the manubrium. For reference, we'll keep the xiphoid process and costal cartilage and add soft tissue to the trachea. Remember, the second costal cartilage articulates with the sternum at the Sternal Angle of Louis and the first costal cartilages and clavicles articulate with the manubrium near its superior end. We'll leave in the liver and spleen in place to remind us of the phrenic diaphragm that is draped over these structures. Rotate the 3D image to appreciate the relationships of these internal oragans and the surrounding skeleton. When finished, return to an anterior view. On yourself, feel the apex heartbeat in the 5th or 6th intercostal space just medial to the midclavicular line. Add the left ventricle, which forms the left border of the heart, and note the location (the transverse slice number) of its inferior end - this is the apex. If you do not see cross-section numbers, check that item under "VIEW" dropdown menu. This is image 454. Using the arrow keys move to axial image 489 and observe the pink walls of the left ventricle in both windows. You are now marking the apex of the heart. For the right border of the heart, add the right atrium. Mentally, fill the space between the right and left borders of the heart on this coronal view. (The "empty" space holds the left atrium and right ventricle.) This is how the heart would appear on an AP or PA chest radiograph.
The arch of the aorta receives blood from the left ventricle. Observe how it swings to the right edge of the sternum and back to the left as it arches from anterior to posterior behind the manubrium and ends just to the left of the manubrium. Locate right and left borders of the arch of the aorta on an AP or PA chest radiograph. Rotate the 3D image to a left anterolateral view to better appreciate the arch. Vary the skin opacity to visualize the surface projection of these structures.
Remove the manubrium and ascending aorta to see the trachea bifurcate at the Sternal Angle of Louis. The right branch (right main bronchus) continues behind the ascending aorta for a total length of 2.5 cm before branching into three secondary bronchi. The left main bronchus continues 5 cm before branching to two secondary bronchi. Explain the reason for this number of secondary bronchi. Locate the bifurcation of the trachea on a chest radiograph and a bronchiogram. Add back the ascending and also the descending aorta and rotate the 3D image through 360°.
The pulmonary trunk receives blood from the right ventricle. Rotate the image to a left lateral view to see the relationship of the right ventricle to the main stem bronchi and the arch of the aorta. The left and right branches of the pulmonary artery parallel the left and right main bronchi.
(Graphics Resource "Heart valves in situ")
Mentally, draw an oblique line over the heart that extends from the left 3rd costosternal joint to the right of midline, just above the xiphisternal junction. The four heart valves lie along this line. (We removed the walls of the right ventricle, ascending aorta and pulmonary trunk so that your view of these internal structures is not blocked.) Use mouse rollover to identify the tricuspid, mitral, aortic and pulmonary valves.
Why would it be difficult to hear individual valves by listening directly over each valve?
The valves are too close together to hear (distinguish) separate the sounds.
The blood coursing through the valves carries the sound of the valve with it. Here are the auscultation points:
Extra credit: for each valve, relate the chamber of the heart in which the blood originates to the vessel or chamber it enters after passing through the valve. If you like, use the index to add in the left costal cartilages. This may make it easier for you to infer the position of the manubrium and body of the sternum.
Observe how the lungs extend above the clavicles. Add the diaphragm. During inhalation, the diaphragm flattens and pulls the abdominal contents inferiorly. The lungs expand to fill the space that is created between the diaphragm and the rib cage and air is sucked into the expanded lungs.
Remove the diaphragm and add the gallbladder. Note the relationship of the gallbladder to the intersection of the costal margin and the transpyloric plane, and also the intersection of the costal margin and the mid-clavicular line. Rotate the 3D image (using the arrow keys) from its left anterolateral view to a right anterolateral view to get a better idea of the location of the gallbladder. AN enlarged gallbladder may be palpable by forcing your fingers up under the rib cage. (Not fun, I don't advise it!)
Now add the liver (we've also added more ribs for reference, and changed the color of the gall bladder). Rotate this image through 360°.
The spleen is not palpable unless it is very enlarged. In this donor, the spleen is normal size; rotate this image through 360° and observe its posterior extent. In the case of an enlarged spleen, the tip of the spleen can be palpated anteriorly in the intercostal spaces where the left anterior-axillary line crosses the transpyloric plane (axial plane defined by the mid-clavicular line crossing the costal margin. This point is indicated by the crosshairs in the cross-sectional images and corresponds to the 8th intercostal (between the ribs) space. (Ribs 8, 9, and 10 have been added and highlighted in white for reference.)
Add the abdominal aorta. The aorta originates at the heart and is called the abdominal aorta after crossing the diaphragm. We'll add the rest of the aorta later. Rotate the image to a left anterolateral view. The descending aorta crosses the diaphragm at T12 (L1 in this donor). Note how the abdominal aorta ends at the L4/5 disc, just below the umbilicus (increase skin opacity to visualize the umbilicus) in the transverse plane connecting the iliac crests. In a thin individual who is completely relaxed, the pulsating abdominal aorta may be palpated. Now add the common iliac arteries. At L4 the aorta bifurcates, to form the left and right common iliac arteries. After giving off the internal iliac arteries, they continue as the external iliac and then common femoral arteries (use mouse rollovers to identify these structures). Note that the external iliac artery changes name to the femoral artery as it crosses the Inguinal Ligament of Poupart. The renal arteries branch off the aorta near the subcostal plane (L2). A bruit is the sound of turbulence when an artery becomes partially occluded by disease. Increase the skin opacity. Most beginning residents incorrectly place their stethoscopes when trying to listen for a renal bruit, because they have forgotten this important relationship!
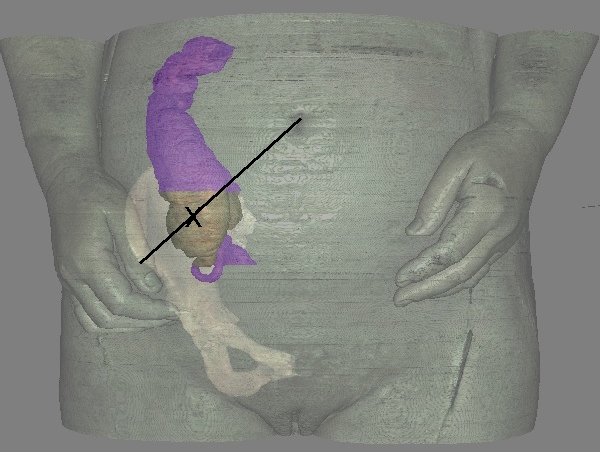
McBurney's point is where a surgeon would make an incision to remove an inflamed appendix. This point lies 1/3rd the distance from the right anterior iliac spine to the umbilicus (naval). Note that this is near the junction of the large and small intestine. In this image the terminal ileum (of the small intestine) and ascending colon are purple. The cecum is brownish. If an appendix were present it would be near the ileocecal junction. Increase skin opacity and then set to zero. Rotate the image through 360°.
In another image taken from the Visible Human Female, we can see the appendix. The appendix, ascending colon, and terminal ileum are purple. The cecum is brown. McBurney’s point marked by the “X” overlies the cecum. Rotate the female image through 360° to better appreciate the abdominal relationships.
When performing a physical examination be aware of the following important considerations: